Tuesday 26 February 2013

Construction of grids

CONSTRUCTION OF GRIDS

Before you can apply a grid you must understand the requirement of the grid for the work to be produced.
Typeface text & illustration print method and paper quality must be confirmed before hand.

Always start with sketches - thumbnail sketches will make your job of finally layouts easier and productive.

Thumbnail sizes should be proportonate to the final format.
Before drawing your sketches consider the number of columns needed-
1 column only for text and illustration gives you little freedom of layout.Restriction of making illustration small, medium or large.

2 columns, logically gives you scope: 1 column for text 1 column for illustration that can be mixed together.

2 column division can be sub dived to create a 4 column page.

Disadvantages of 6 column systems are:
lines of txt will be narrow small typeface has to be used. however this solely rests on the function that is to be preformed.

For statistics , Figures , graphs & trend line publications: Use 4 columns per page.

The width of a column dictates the size of typeface used. The rule: The narrower a column is the smaller the typeface. why is that?
  • Make a variety of thumbnails and layouts/designs
  • Do not rely on just one set of thumbnails
  • Englarge a small selection of appropriate thumbnails
  • Compare select and repeat the process until you are confident with the design.
APPLY TYPE TO COLUMNS
  • The first line must fit flush to the top limit of the column grid.
  • The lsat line must stand on the bottom limit
  • Keep calm it is difficult to find the final solution the first time around.
  • It could mean that your grid field is too hight or too low.
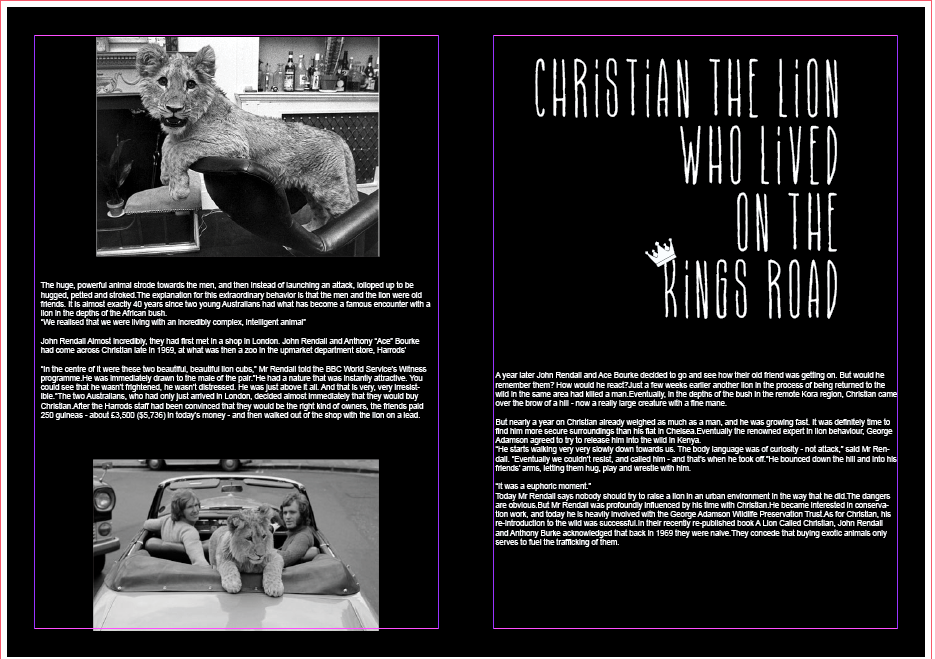
TYPE & PICTURE

A4 format

8 & 20 grid fields , 8 grid fields are used frequently for advertising material and brochures.
If using 8 field grids you can subdivide into 16 grid field

8 grid fields allow various sizes of illustration to be portrayed. You can use with or without text. You need to have a good perception of composition.

Creating our own
We first made an a4 page spread and made the measurements 15mm  25mm  for the margins and 2 columns.

To create guides we went to layout create guides. we can select how many rows and columbs we want.
To create the a grid the easiest way is to create grids is to grab a rectangle frame tool and using the up arrow and the right arrow to create guides across and up.

Making guides with a ruler and pulling it to the top and bottom helps create symmetry if you click on the bottom ruler guide and then clicking on the Y axis you then put ' /2' which splits the page width and puts you a guide right in the centre.


Another way to make a grid is to go to window>utilities>scripts and click on apple script this gives you an option to make grid.


Monday 25 February 2013

studio brief 3 PROPOSAL&CRIT

PROPOSAL&CRIT

10,000 STEPS

INTIAL IDEA:As a group we got together and discussed all of the research we have done and any ideas that anybody had. We then spoke about which idea we felt worked the best for this brief, taking into consideration that we have 3 weeks to complete this brief so the idea had to be able to run for that amount of time. We also had to think about 'Communication is a Virus' which I think is the most important part to this brief; it is all about being able to communicate our idea effectively and ensuring that our message/concept/product can be spread and distributed easily. We are thinking about creating a brand that sells affordable running products such as footwear, apparel, gear and nutritional goods. This means that we could put our brand logo on all of our products which effectively would be distributed all over, meaning that people would be able to see it. It would be accompanied by a website and/or application that would help in the delivery of our message; these aspects would have to contain our information about walking and '10,000 steps' etc.

AFTER THE PROPOSAL CRIT-
In the crit it was brought to our attention that whatever we do for our brief it had to be something we could actually do so if we were to create a brand or a kit we would actually have to make it and distribute it which would cost a lot of money and wouldn't be possible in the short space of time we have. We were told by Amber & Simon that our over all theme was a good idea but we needed to focus more and eliminate the factors that were not as sutible  as others.  

WHAT WE CHANGED & OUR BRIEF-
we decided that we would change our idea slightly instead of creating a kit we would instead create a publication we could hand out to people, it will explain to them the importance of keeping fit and how important walking is as to going to the gym. The publication will be in the style of a graphics book and will filled with inspirational quotes and info graphics. 
We'll be successful because our publication won't look like other peoples publications it won't be crammed with loads of pointless stuff and to much to look at . It will be simple and aesthetically pleasing.We will include a leeds city map of 10.000 steps. Were going to hand our publication out to people in the street taking inconsideration the times of day people are out on there lunch and starting and finishing work.


BA (Hons.) Graphic Design
10,000 Steps

LEVEL4
STUDIO BRIEF


Brief

You are required to produce a publication that motivates and encourages the general public to keep fit by walking 10,000 steps a day. Your response should consider the context of where the publication will be distributed and consider what will be appropriate for your target audience. This is something which you will need to identify as part of your initial concept proposal.
Background/Considerations

What do you want to say? How do you intend to say it? What language is appropriate for your audience? 

Will the content be communicated primarily through type or image? If it is both what is the relationship between the two? How can your information be displayed through image?

A limited colour palette, two colours plus stock. How will you tailor the content to suit this requirement?

What are you aiming to achieve, how will you achieve this? What will you need to take into consideration in order to achieve this?

How would this project evolve if it was to be continued in the future? What other outcomes would be made? How would this help deliver the message?

Have you taken cost into consideration? What choices will need to be made? Have you thought about future mass production?

What size will your outcome be? Will this be effected by your audience? Will this be effected by practicality?

You should resolve this problem by the deadline stated below. However, if you have plans to extend the scope and ambition of your response beyond this deadline you should include these proposals in your presentation.


Mandatory RequirementsDeliverables

Your response should remain within legal boundaries. NB - Any activities that may cause damage, personal offence or involve acts of an illegal nature are not encouraged or supported by the delivery of this brief.You must seek appropriate permission for all activities associated with this brief.


Design development sheets.

Concept/proposal appropriate to your idea.

3 x A2 presentation boards identifying:
Concept
Content
Method of Delivery

Publication encouraging walking.
Studio DeadlineModule Deadline

Friday 8th March 2013

3rd May 2013

Thursday 21 February 2013

InDesign Double Spread 'Lion'

InDesign Double Spread 'Lion'
Quick sketches for ideas for layouts-


The font i've used for my title for my double page spread is 'HIGHER THAN HIGH' i found this font on the font .com and i think the font represents to me the lion king and tribal.
I made my double page spread and started to pay about with the text to see which position looked best.


Centre aligned
Left aligned

 I tried the text on the right hand side page left aligned then again spaced out.
I decided to create some paw vectors to type my title into.


Mockups-


I first followed a grid where i had the text in one large column in between to images on one page and under the title on the other. I wanted the text to be large and take a lot of the space up on the right hand page. I was quite pleased with this mock up design but it looked a little out of proportion..


I inverted the colours and tried all the text on a black background so see what it looked like i decided although i wanted to work with monochrome colours the impact was to high and its a soft warming story so i felt that the black was to much.
I decied to add a third picture in that i had and make them all the same size and down the centre of the left hand page.i felt this created impact. I think it works well with the negative space and the black and white images.
 Where the title was placed on the right hand side it was a little blank so i thought i would add in a another image this made the page looked more balanced. 

I had to make sure all the images were the same size and to follow a grid , i wanted it to keep central and in proportion  to the title and the other information on the opposite page.
Making sure the  title was in line with the image was important to the page didn't look strange and followed a grid. I used rulers to measure the gaps between the words after using the leading tool on indesign just to check..
I wanted to use the same type i used for the title to use for the quote id taken out of the text which was 'It was a euphoric moment' I put the quote in the negative space under where the text had finished.
I finally made sure everything was in line and inside the margins so there was enough finger space at the bottom and everything was clear enough to read i wanted to go for a really nice clean cut design and i think i have achieved it.
After my final finished piece i asked a few of my peers there opinion they told me my quote would look better with the quotation marks , the only problem was my typeface i had chosen 'higher than high' didn't have glphys so i had to find a similar typeface to use for the open and close brackets. I also received feedback to make the crown on the work 'king' smaller because it looks slightly like a 'R' and not a 'K' I'm really pleased i asked my friends to give me feedback or i wouldn't of knew what to change and improve on and my double page spread ended up looking better.


CYMK WORKSHOP screen printing

CYMK WORKSHOP

We had a screen printing workshop to make a hot dog book. This book would contain the rules and guides of the screen printing workshop..
we first were to use the colour yellow we mixed the yellow paint and put it on top of the screen , we used news print and printed so see where the print was on the board so we could put masking tape down to make it for the paper.After the first print a yellow square and a tshirt printed onto the paper.
The second colour we used was magenta we put the paper portrait and on the marks that were on the board and repeated the process we were given a layer of pink over our yellow cake and a bird and an apple.
The third colour used was cyan we repeated the same process as the other two colours, we realised tim the cyan colour we had to put more ink down because we were getting a blotchy effect on our paper. The cyan left the dividing lines and the large A & B.
The final colour we used was black this finished off the document we were left with a image in the corner of a cake that was fully filled with different colours and a fully blocked square on the other side.
When our screen print was dry we cut the sides off and scored along the middle we folded the book together to make a hot dog book which folded out to read information.


InDesign Workshop

 DOUBLE PAGE SPREAD.. Animal - LION
Width 190mm
Height 237mm
Bleed - 3mm
FACING PAGES, NUMBER OF PAGES 2.
When first creating the document we realised that the first page is always the e.g front cover and wouldnt work as a double spread so we had to re-add a page into the document. so when we come to print we will just select pages 2-3
Correct print options
Range: 2-3 pages because we don't want the front page printing.


Using the layout options we selected the create guides option so we could create which number or rows and columns we wanted.
We put our original image into photoshop and made it into a tiff and saved the file. This file would be place into indesign. We unselected the resample image and pressed ok.

Due to the loss of quality in the image because the image needs resizing in photoshop. The quickest way to get to photoshop from indesign is to right click ..

we changed the width to correspond with the image size of the image in indesign.
You can really tell the difference of the image to the left compared to the pixelated image on the right. Resizeing the image gives photoshop more information about the image.